It all started three years ago. We had bought a new house half a year ago, and had finished moving everything. We had then hired a family friend to do some renovations, but I volunteered to replace the carpet with vinyl planks. I chose vinyl planks over hardwood floors, engineered floors, and laminate, because vinyl planks are easier to install, without the need to level the ground, or install a subfloor layer. In addition, they are more weatherproof - being waterproof. Finally, vinyl planks are more durable and relatively cheap. In terms of shortcomings, vinyl planks do not retain heat as well as hardwood floors, and also lack the specific feel of the hardwood floor, which all the categories I have named wish to imitate. As we had planned to rent the house out, I decided the benefits greatly outweighed the shortcomings.
I had wanted to make a post about it, but never got around to doing it, as I wanted to add helpful sketches and diagrams to illustrate the experiences I had accumulated. Over the past month, I replaced the carpet in the room my grandma was in with the extra vinyl planks I had left over from the old house. This time, I was able to make some hopefully helpful illustrations.
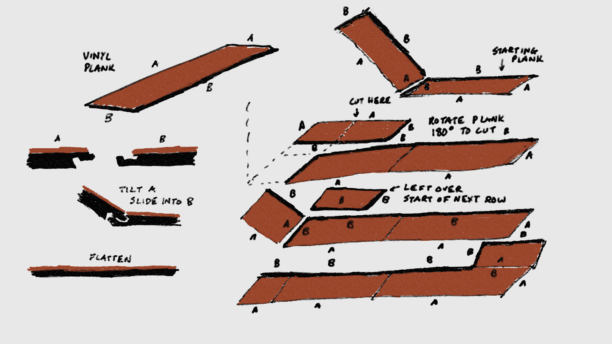
There are various kinds of vinyl planks. The cheaper ones are usually installed by gluing them onto the ground. Aside from being a pain to install, they are also a pain to remove, but will start peeling and flaking over time. Higher quality vinyl planks come as planks that resemble their hardwood counterparts. They have interlocking mechanisms. The one I got makes a satisfying knocking sound when the planks have been locked into place. This first diagram shows how to put two planks together. Once you reach the edge, where a whole plank won't fit, rotate the plank 180 degrees, and cut where the last plank ends, as illustrated. This allows the cut edge (which cannot be locked to any other plank) to be at the end of the walls. To cut the plank, use another plank as a guide. Using an X-ACTO knife, or similar knife, score the plank a few times. Then, flip the plank over, and snap the plank along the score. It should snap cleanly - part of what makes vinyl planks so easy to install. Use the leftover portion of the plank as the start of the next row.
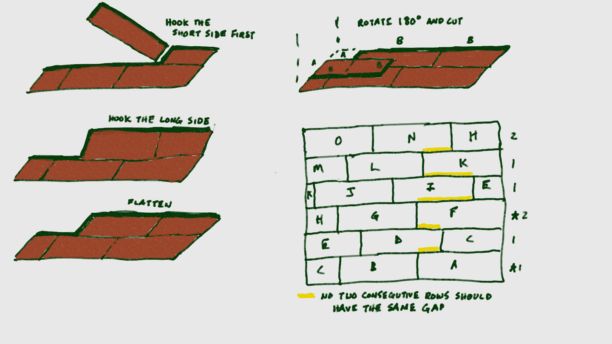
Once you get past the first row, you now need to simultaneously install planks that have two edges. I install the short edge first, then the long one. As vinyl planks are flexible, it can be either a blessing or curse. On the positive side, you don't have to lift up the whole row to install the next plank. There's room to fudge things a little, and wiggle the plank in without lifting the whole row. On the negative side, small bends in the plank may cause the locking mechanism to be misaligned. Sometimes, it takes some wiggling to align the locking mechanism. This type of feel only comes with experience, and it's a bit difficult to explain how to do it.
Once you reach the end of the room, there is no space to make measurements. That is when you rotate the plank 180 degrees once again, put it over the already-covered floor, and make the cut along the edge of where the last plank ended, similar to what you would do whenever you reach the end of a row.
Finally, when laying planks down, usually you would use the leftover portion of the last plank of the previous row as the start of the next row. However, one important thing to keep in mind is that the floor should not have a discernible pattern. Eyes are very good at catching patterns. If you always used the leftover part of the previous row as the start of the next row, a zigzag pattern would show up running diagonally across the room, since each row would have the same gap between planks from each row. Thus, after every two rows, it is necessary to change things up a bit, either by using a brand new plank, or using leftover parts of previous ends or rows, except for the last row that was done.
The majority of the room is easy to do. It's the walls and doorways that are challenging, and making tight fits take up the most time. However, it is crucial that time be taken to make sure the planks don't leave any gaps on the floor. Finally, for the doorways, to bridge the gap between two different kinds of flooring, use a T-molding or Reducer (depending on the gap between the height of the two kinds of flooring.
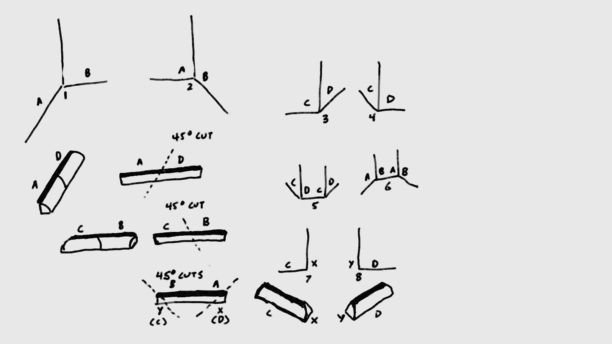
Now that the easy part is done, there will usually be a gap between the flooring and the molding along the walls. To fill the gap, use quarter rounds. Unfortunately, while cutting vinyl planks is all about perpendicular cuts, cutting quarter rounds involve 45 degree cuts. This requires the use of a mitre box. That makes all the difference in the world. Since quarter rounds are not symmetrical, cuts need to be carefully considered.
Strictly speaking, there are only two cuts that can be made. However, of those two cuts, we get four unique pieces, which are used in a variety of corners. Whereas re-using planks was a straightforward matter, reusing quarter rounds take lots of thought and planning. Making a wrong cut results in much anguish.
Once all the quarter rounds have been cut and fitted, all that's left is to glue them in place. I use a bottle of Liquid Nails to glue the quarter rounds and moldings. I do not glue the planks. I then use unopened boxes of planks to hold them in place for 8 hours.
That pretty much sums up how you do it. There's a few miscellaneous notes to keep in mind.
When transporting planks, I could fit at most 8 boxes of planks in my trunk before the back wheels start rubbing against the top of the wheel wells. Transporting lots of planks at once requires a car that's heavier duty than a common sedan. In order to do the old house (around 1500 sq. ft), I bought 80 boxes of planks. I had around 10 boxes left over, and quite a bit of scrap. After doing this room, I still had more than 3 boxes left.
Never throw away the scrap. They can be used to fill in holes as well as used to hammer in planks.
Written on November 27, 2016


